Projector에 대해서 이렇게 기본부터 자세히 설명한 글을 찾기 힘들 것 같아서 번역을 결심한지 벌써 몇 달이 흘러간 듯 하다. 이런 저런 우여곡절이 있었지만 어쨌든 번역을 완료하여 올리게 되었는데, 번역한지 오래되어 앞 부분의 내용은 이미 가물가물. 나도 다시 한번 읽어봐야 할 듯.
후반부 번역은 >허상훈군의 도움이 있었고, 각자 블로그에 게시하기로 결정하였음을 밝힌다.
> 원문 : Guide to Projectors for Interactive Installations
—————————
Guide to Projectors for Interactive Installations
written by Blair Neal
Video projectors are one of the most important tools for creators of interactive installations. The information for projectors is available on various websites, but this 2 part guide will focus on their use in production and interactive environments. Part 1 will focus on the projector as hardware(lenses, lumens, surfaces etc), and part 2 will go into more details on the software and calibration considerations. This will gather some of that disparate knowledge into the important bits you need to make informed decisions about creating a high quality experience.
비디오 프로젝터는 인터렉티브 설치 작업을 하는 크리에이터들의 가장 중요한 도구 중 하나이다. 프로젝터에 대한 정보는 여러 웹사이트들에서 볼 수 있지만, 2 부분으로 구성된 이 가이드는 프로젝터를 제작과 인터렉티브 환경에서의 사용에 대하여 중점을 둘 것이다. 파트 1은 렌즈, 루멘(광량. >엔하위키 설명 참고), 표면 등 프로젝터의 하드웨어적인 내용에 중점을 둘룰 것이고, 파트 2는 소프트웨어와 프로젝터의 설정/조정에 대한 상세한 내용을 다루려고 한다. 이 내용들은 높은 수준의 경험을 만들기 위한 잘 알려진 요소들을 결정하기 위해 당신이 필요한 중요한 지식들을 모아놓게 될 것이다.
They vary in scale from pocket-sized (or smaller) pico’s to refrigerator sized large-venue projectors. They vary in price from a couple hundred dollars, to a couple hundred thousand dollars. In the end, however, essentially all projectors can be described as little more than a bright light element, imaging elements, and a lens. There is something technical about projectors that seems to mystify some people, but it is really important to remember that they are just a flashlight that shoots a square shaped image. In this article we will discuss:
프로젝터는 포켓 사이즈의 작은 크기부터 냉장고 사이즈의 커다란 것까지 다양하다. 수백 달러부터 수천 달러까지 가격대도 다양하다. 결국에 모든 프로젝터는 밝은 광원, 이미징 요소들 그리고 렌즈 외에 더 다양하게 설명할 수 있다. 어떤 사람들에게는 미스터리하게 보이는 기술적인 요소들도 있는데, 어쨌든 프로젝터는 단지 네모난 모양의 이미지를 상영하는 전등이라는 것을 기억하는 것이 중요하다. 이 글에서 우리는 다음의 내용들을 논의할 것이다.
- A checklist for planning your installations
- Overview of projector types
- Different classes of projectors
- How to calculate projector intrinsics/How to read and interpret a spec sheet
- How to calculate proper brightness
- Discussion of video signal quality and cable lengths
- Maintenance, Miscellaneous caveats and tricks of the trade
- Experimental tech and the future
- References and Thanks
- 당신의 설치 작업을 위한 체크리스트
- 프로젝트의 종류
- 프로젝터의 서로 다른 등급들
- focal, aspect ratio and principal point(렌즈 중심에서 수직으로 연결되어 화면에 닿는 점. Wiki설명 참고)와 같은 프로젝터의 내부 파라미터들, 그리고 프로젝터의 spec sheet를 읽고 해석하는 방법
- 적절한 밝기를 계산하는 방법
- 비디오 신호의 품질과 케이블 길이에 대한 논의
- 유지보수, 프로젝터의 수출입에 대한 여러가지 강제적인 조건들과 트릭들
- 실험적인 기술과 미래
- 참고자료들
Projection Planning Checklist:
Here is a sample checklist that you can go through when planning to choose a projector for an interactive installation or large event. Each decision made here has it’s own list of caveats and considerations that can affect the final outcome. Some of these topics will be covered more in depth later on:
아래의 체크 리스트 예시는 인터렉티브 설치 작업이나 대규모 이벤트를 위해 프로젝터를 선택할 때 사용할 수 있다. 각 항목들의 결정은 선택의 결과에 영향을 줄 수 있는 자체적인 조건들과 고려사항들의 목록을 가지고 있다. 나중에 그런 내용들을 다루게 될 것이다.
- What is the surface or object you’ll be projecting on?
- Standard screen? Front or rear projection?
- Fabric or scrim?
- What color is the surface?
- What are you projecting on? Flat surface or complex geometry? Is it an unusual shape/curved/architectural/sculptural
- What is the environment like?
- Inside or outside? Daytime or night time?
- How much ambient light is there? Is it a bright show room, or a dim purpose-lit space? Is there lighting design?
- How will you mount or place the projector?
- Will the venue allow you to drill into the ceiling?
- How will you run cleanly run cables from your command station to the projectors? (More on cable lengths later)
- Where are people (or other objects?) going to be in relation to the projectors?
- Is there a potential for shadows?
- What image size are you trying to achieve?
- 프로젝션을 할 곳이 표면인지, 아니면 물체인지?
- 표준 스크린인지, 아니면 전면 또는 후면 프로젝션인지?
- 천스크린인지, scrim 인지?
Scrim : 빛을 반사하기도 하고 투과시키기도 하는 재질의 스크린. >적용사례, >Wiki 설명 - 프로젝션할 표면의 색상은 무엇인지?
- 프로젝션을 할 표면이 평평한지 아니면 복잡한 면들인지? 특이한 모양/커브/건축물/조각물인가?
- 주변 환경은 어떤가?
- 실내 또는 실외인가? 주간 또는 야간인가?
- 주변광은 얼마나 되는가? 밝은 쇼 룸인가 아니면 어둑한 무드 조명이 된 공간인가? 조명 디자인이 있는가?
- 프로젝터를 어떻게 설치 또는 배치할 것인가?
- 설치 장소에 프로젝터의 고정을 위한 드릴 공사 등을 할 수 있는가?
- 관리 스테이션에서 프로젝터까지의 케이블을 어떻게 깔끔하게 연결하고 설치할 것인가? (케이블의 길이에 대한 문제도 있다)
- 사람들이나 다른 사물들이 프로젝터와 어떻게 관계될 것인가? (시야, 동선 등)
- 그림자가 드리워질 가능성이 있는가?
- 상영하고자 하는 이미지의 크기는 무엇인가?
Visiting the installation space in person is optimal when starting to plan. A visit will get you the best sense of space, available electrical outlets, positioning options and the sense of ambient light. Pictures and CAD drawings of the space are next in line of importance of things you should obtain for the space, even if you visit it. After that, it’s up to you if you want to sketch out placement on paper, model their placement in a 3D rendering, or make a scale diorama.
계획을 세우기 시작할 때 설치 장소를 개인적으로 방문해보는 것이 좋다. 공간에 대한 감을 얻고, 사용 가능한 전기 콘센트와 설치 위치에 대한 방법들 그리고 주변광에 대해서도 알아볼 수 있다. 그리고 비록 이미 방문을 해봤더라도 공간에 대한 그림들과 캐드 도면들을 입수하는 것은 그 다음에 해야할 중요한 일이다. 그리고 나서 종이 위에 배치도를 그리든, 3D 모델링을 하든 모형을 만드는 것은 원하는 대로 할 수 있다.

Onion Skin by Olivier Ratsi [Antivj] – Re-composition of time and space using perspective
Overview of Projector Types
There are several different kinds of imaging and illumination methods used in video projectors, and each type has their own list of pros and cons. Each technology uses a different combination of light sources, mirrors, filters and lenses. Below, I’ll briefly explain each type, and you can check out some links in my sources for further reading:
비디오 프로젝터를 이용해서 이미지를 상영하거나 조명을 적용하는 몇 가지 다른 방법들이 있고, 각 방법들마다 각각의 장단점이 있다. 각 기술들은 서로 다른 광원, 거울, 필터와 렌즈의 조합을 사용한다. 아래에 각 방법들을 간단히 설명할 것이고, 관련 자료의 링크들도 확인할 수 있을 것이다.
DLP
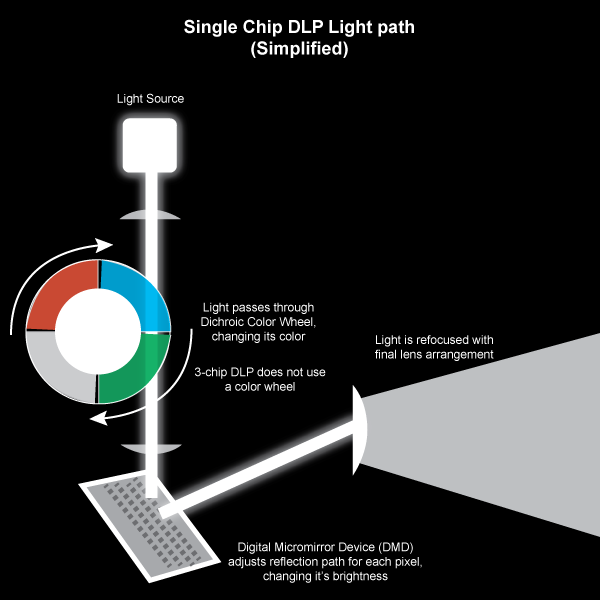
This is one of the most commonly used projector types, and they often provide the most bang for your buck. A big selling point on DLP technology is that it can display much darker blacks than LCD technology which is especially helpful for illusions like projection mapping. There are a few different styles of DLP, Single chip and 3-Chip. In single chip DLP, a light source is passed through a rapidly spinning multi-segment color wheel of 3 or more dichroic glass sections (7 or more color segments is a more “desirable” spec than 3). That light then bounces off a matrix of electrically controlled microscopic mirrors that determine the brightness of each individual pixel. The beam then passes through filters and out through a lens. The timing between the color wheel and the movement of the mirrors determines the color of the output.
이것은 가장 일반적으로 쓰이는 프로젝터 타입이며, 보통 가장 큰 효과를 제공하는 방법이다. DLP의 큰 장점은 프로젝션 맵핑에 특히 유용한 LCD 기술보다 훨씬 짙은 검은 색을 상영할 수 있다는 것이다. DLP는 single chip과 3-chip DLP가 있다. Single chip DLP에서 램프의 빛이 빠르게 회전하는 3개의 칼라 휠이나 더 여러 개의 dichroic glass(빛에 따라 서로 다른 2개의 색상을 보이는 유리)을 통과하게 된다. 이런 경우 3개보다 7개나 그 이상의 색상 구분이 더 좋다. 빛은 전기적으로 조절되는 미세한 거울들에 부딪히면서 각 개별 픽셀의 밝기가 결정된다. 그리고 빛은 필터와 렌즈를 통과한다. 칼라 휠과 거울의 움직임 사이의 타이밍이 각 픽셀의 칼라를 결정한다.
>wiki : Digital Lighting Processing
With DLP projectors, the most noticeable side effect of this imaging method is a RGB effect that appears when you quickly move your eyes side to side. You will also notice a subtle rainbow banding effect if you capture the projection through certain types of cameras, especially CMOS DSLR’s. You can minimize this effect by adjusting your camera’s shutter speed to be slower. This banding effect is minimized or non-existent on 3-chip DLP projectors that split the light path in a similar way to how LCD projectors work so it syncs colors without a color wheel. A 3-chip DLP is a little more expensive though, and you’ll mostly find it on cinema projectors and ones with more than 10k lumens.
DLP 프로젝터에 대해서 가장 잘 알려진 문제는 눈을 여기 저기로 빨리 움직이며 볼 때 나타나는 RGB 효과이다. 또한 프로젝션을 어떤 타입의 카메라들, 특히 CMOS DSLR로 찍을 때 나타나는 미묘한 무지개 효과를 볼 수 있다. 카메라의 셔터 스피드를 낮게 하면 이런 효과를 저감시킬 수 있다. 이런 무지개 효과는 3-chip DLP 프로젝터들에서는 최소화되거나 사라지는데, 3-chip DLP는 LCD 프로젝터와 비슷하게 빛의 경로를 분할해서 칼라 휠 없이 색상을 맞추는 방식이다. 3-chip DLP는 좀 더 비싸고, 영화 프로젝터들이나 10k 루멘스 이상의 프로젝터들에서 볼 수 있다.
LCD
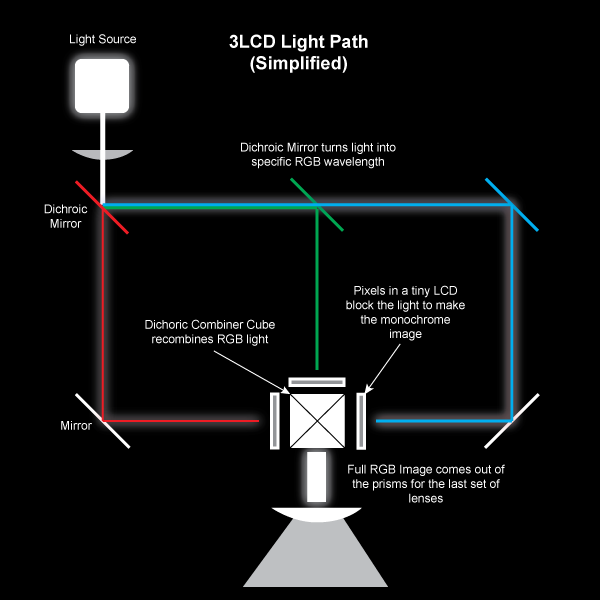
There are a couple different LCD technologies for projection, but 3LCD is probably the most recommended in terms of image quality. With LCD projection, a light source is bounced through 3 dichroic filters that turn the white light into precise red/green/blue frequencies. Those differently colored beams of light then pass through liquid crystal arrays that turn on and off their pixels and block the different light patterns to form the image. Those LCD’s are then recombined with a prism that recombines the 3 colored segments into a single light beam/image that then passes through a lens. Whew. LCD projection doesn’t have the rainbow banding effect that DLP does and tends to be easier to film, but it doesn’t have the darkest blacks, so it doesn’t disappear as much when the screen is just displaying a black image.
프로젝션을 위한 LCD 기술에는 몇 가지가 있지만 3LCD가 가장 이미지의 품질에서 추천할 만 하다. LCD 프로젝션에서 광원에서 나온 빛은 3개의 dichroic 필터들을 통과하면서 R/G/B 색상으로 바뀌게 된다. 분리된 각 색상의 빛은 liquid crystal들을 통과하면서 이미지를 구성하는 패턴으로 만들어진다. 3개 색상의 빛은 프리즘에서 다시 합쳐지면서 하나의 빛으로 변하고 렌즈로 나가게 된다. LCD 프로젝터는 DLP의 문제인 무지개 효과가 없어서 촬영을 하기가 더 쉽다. 그러나 LCD 프로젝터는 가장 어두운 검정 색상을 구현하지 못하기 때문에 스크린에 단지 검은 이미지를 상영할 때 사라진 것처럼 보이지 않는다.
LCD Projector Teardown Video : http://www.youtube.com/watch?v=ieJJUhJkyBc
How LCD and DLP projectors work : http://www.youtube.com/watch?v=qOsibeDX8jM
DLP와 LCD의 투사 방식 차이 : http://blog.naver.com/PostView.nhn?blogId=interrush_av&logNo=191348160
LCoS
Liquid crystal on silicon is almost a hybrid of how DLP and LCD work, and can provide advantages over both. LCoS has a reflective portion, but is also modulated by liquid crystal. There is no color wheel in this setup, as it does the light splitting technique similar to LCD. The primary current issue with this technology is that the contrast ratio tends to be much lower than DLP or LCD, so your contrast range from true black to bright white is reduced.
LCoS(Liquid Crystal on Silicon)은 DLP와 LCD 방식의 혼합형이며, 2가지의 장점들을 모두 제공할 수 있다. LCoS는 빛을 반사하는 부분도 있고 또한 liquid crystal에 의해 조절되기도 한다. 칼라 췰이 없어서 LCD 방식처럼 빛을 분리해낸다. 현재 LCoS의 가장 큰 이슈는 DLP나 LCD에 비해 낮은 명암비율이며, 가장 검은 색부터 밝은 흰색 사이의 명암이 감소된다.
Hybrid
There aren’t many of these yet, but a couple brands have come out with hybrid light source projectors that boast extremely long lamp life (20,000 hours compared to the normal 2-3000 hours of a traditional lamp). These still use some of the traditional imaging sources as above, like DLP and LCD, but they replace their lamp bulb with a different solid state source like LED, Laser, etc etc.
아직 많지는 않지만 몇 개의 브랜드에서 기존 램프의 2~3천시간 정도 수명을 2만 시간까지 늘린 하이브리드 광원의 프로젝터 등을 소개하고 있다. 그런 프로젝터들은 여전히 DLP나 LCD와 같은 기존의 방식이지만 램프 전구를 LED나 레이저같은 다른 종류로 교체하였다.
Laser Diode
This is another fairly new player that isn’t wide spread yet. I’ve seen it in a new Sony projector and the yet-to-be released RedRay 4K. You can also find this as a light source in some of the smaller Pico projectors like Microvision’s. Primary advantage of a light source like this is that you don’t have to worry about heat dissipation as much as you would with a Xenon bulb.
이것은 아직 별로 퍼지지 않은 새로운 형태이다. 나는 아직 출시되지 않은 >소니의 레이저 프린터와 >RedRay 4K 프로젝터를 본 적이 있다. >Microvision과 같은 작은 피코 프로젝터들의 광원으로 쓰이기도 한다. 이 광원의 가장 큰 장점은 제논 전구와 같은 발열 문제를 걱정할 필요가 없다는 것이다.
CRT
CRT is almost nonexistent in this day and age, but hey, maybe you want to have a vintage party with a laser disc player or something. CRT projection was used a lot in some of those large 90′s era rear projection big screen TV’s. They feature 3 CRT guns in red, green and blue that fire electrons onto a phosphor surface, similar to a standard CRT. Then they are passed through a lens, and onto a projection surface (typically rear projection). The guns are very sensitive about their positioning and typically require re-calibration after moving them around. They are now mostly an interesting thing to scavenge for parts.
CRT는 이제 거의 사용되지 않는 방식이지만, 레이저 디스크 플레이어를 갖고 빈티지 파티를 하고 싶을 수도 있다. CRT 프로젝션은 90년대에 커다란 스크린의 TV에서 후방 프로젝션에 사요되었다. 3개의 CRT 총들이 R/G/B 색상을 인광 면에 쏘는 것으로 표준 CRT와 비슷하다. 그리고 렌즈를 통과한 후에 보통은 후방 프로젝션 방식으로 프로젝션 표면에 보여진다. 총들은 매우 민감해서 위치를 움직인 다음에는 보통 새로 조정을 해야 한다. 그것들은 이제 부품을 구하려면 쓰레기 더미를 뒤져야 한다.
Different classes of projectors
Your project may be a small interactive tabletop game with a single pico projector in a dark room or a 200ft x 100ft projection bonanza with a dozen large-venue projectors. It’s very helpful to know and understand the capabilities of the ranges of the pico, the portable, the installation, and the large venue projectors.
어두운 방에서 작은 피코 프로젝터를 가지고 작은 테이블 위에 인터렉티브 게임을 보여주는 프로젝트일 수도 있고, 12개의 대규모 프로젝터를 30미터 X 15미터 크기로 프로젝션을 해야하는 엄청난 작업일 수도 있다. 피코, 이동형, 설치 그리고 대규모 프로젝터들에 걸쳐 프로젝터들의 능력을 알고 이해하는 것은 아주 도움이 된다.
Pico and Pocket projectors
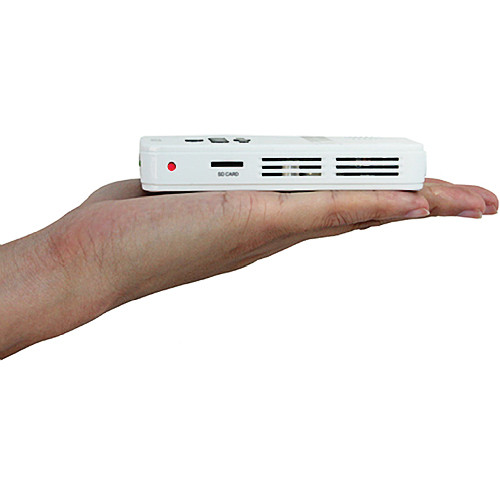
Price range: $100-500
Brightness range: 10 lumens to 500 lumens
Resolution range: 640×480 to 1280×800
These tend to be used in very specialized situations as they tend to have a limited range on the brightness they can provide (usually less than a couple hundred lumens, if that). Don’t expect to have a suitable image that is larger than a couple feet in width, even in total darkness. Pico projectors use different light sources like LED and lasers. Some even contain batteries for battery powered operation (or can be hacked to be battery powered). These tiny things also tend to have reduced resolution and you will more commonly find ones that are more likely in the 854×480 range than the 1080p range. Also, since their primary purpose is for enlarging powerpoints and small movie screens, you can usually be limited by specs on color reproduction and contrast ratio. One of the neatest qualities about a select few laser pico projectors is the fact that they have an infinite depth of field and require no focusing, so you can project on very close up things clearly. Their price is usually comparable to lower end office projectors in the 300-500 dollar range.
이런 종류의 프로젝터들은 제한된 범위와 광량을 제공하기 때문에 매우 특정한 상황들에서 사용하게 된다. 아주 어두운 장소일지라도 1~2미터보다 큰 이미지를 잘 볼 수 있을 거라고 기대하면 안된다. 피코 프로젝터들은 LED나 레이저와 같은 서로 다른 광원을 사용한다. 어떤 것들은 심지어 배터리를 사용하기도 한다. 이 프로젝터들은 또한 해상도를 감소시키기 때문에 1080p의 폭보다 854×480으로 보이게 된다. 주요 용도가 파워포인트 문서나 작은 영화 스크린을 보여주는 것이기 때문에 색 재현도나 명암비가 제한적일 수 있다. Microvision의 가장 좋은 품질의 프로젝터는 사실 무한 심도를 가지고 있고 초점을 조절할 필요가 없다. 그러므로 매우 가까운 거리에서도 깨끗하게 프로젝션을 할 있다. 피코 프로젝터들의 가격대는 300~500달러 정도로 비교적 싸다.
Portable projectors
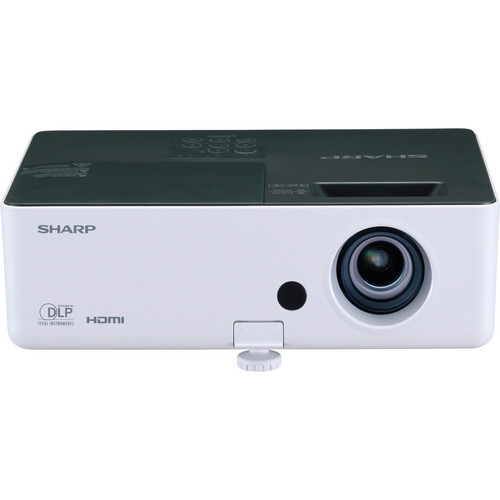
Price Range: $400 to $2,000
Brightness Range: 500 lumens to 3000 lumens
Resolution Range: 1024×768 to 1080p
This class is mostly for the cheaper portable projectors that you might find in a small office or classroom. They often have a single lamp, are lighter, have less brightness options, and a lot less configuration options on their internal software. These ones can get you through certain installations in a pinch, but they aren’t necessarily designed to be as easy to support in an installation setting as the next class up. Some projectors just don’t handle 24/7 operation very well, so keep this in mind. You’ll be somewhat limited on your range of options for throw ratios and image sizes because of the limited brightness ranges at this price point. Some of them have very limited zoom adjustments, and no lens shift. You’re more likely to find cheap ultra-short throw (<0.7) projectors in this range, but their brightness leaves something to be desired any more than 5-8ft away from the surface.
이런 종류의 저렴한 포터블 프로젝터들은 작은 사무실이나 교실에서 볼 수 있다. 보통은 그리 밝지 않은 하나의 램프를 채용하고 내부 소프트웨어의 설정 옵션이 적은 편이다. 이런 것들은 유사시에 어떤 설치물에 사용할 수 있지만 다음의 나올 종류의 프로젝터들만큼 설치 작업을 지원할 수 있도록 디자인된 것들이 아니다. 어떤 프로젝터들은 하루 종일 동작하는 상황에 적합하지 않으며, 그 점을 염두에 두어야 한다. 이 정도 가격대의 프로젝터들은 제한적인 광량/밝기 범위 때문에 제공하는 투사율(throw ratio. >wiki:throw ratio)의 범위가 제한적일 것이다. 어떤 것들은 줌 조절이 매우 제한적이거나 lens shift(상영 위치에 따라 렌즈를 상하좌우로 조절할 수 있는 기능. >Projector Lens Shift) 기능이 없다. 아마 아주 짧은 투사율(0.7미터 이하)의 싼 프로젝터도 있겠지만 광량이 부족하기 때문에 2~3미터의 짧은 거리의 표면에만 사용할 만 하다.
And unless it’s dark DARK night time and your screen is a reasonable size, don’t even think about using these outside.
그리고 아주 어두운 밤에 스크린의 크기가 적당하지 않다면, 이런 프로젝터를 야외에서 사용하는 것은 고려하지 말아라.
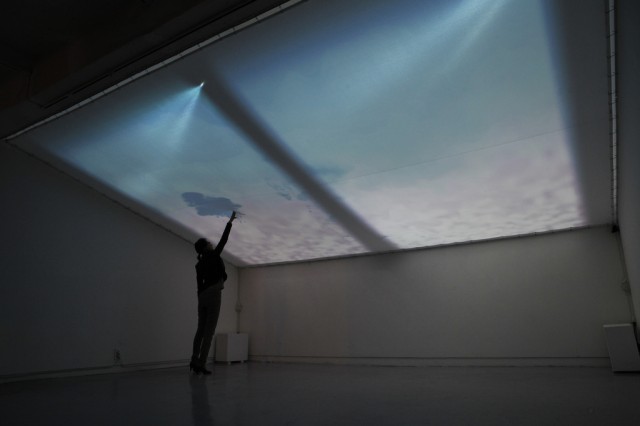
Cloud Pink by Everyware – Another world above…
Installation and Home Theater projectors
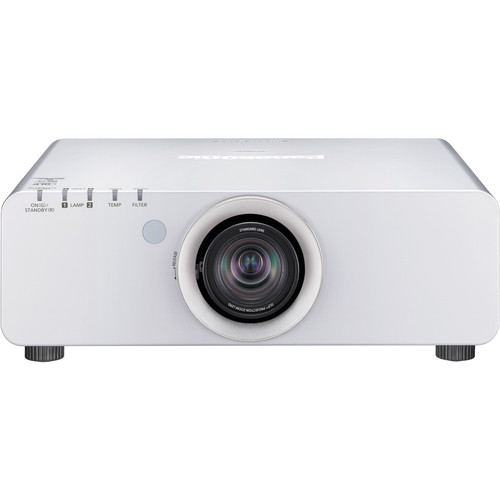
Price Range: $2000 – $10,000
Brightness range: 3000-10000 lumens
Resolution range: 1024×768 to 1080p
It’s hard to cover this class concisely as there are a wide range of brands, lenses, and imaging elements. These will be the go-to for 90% of projects. They will cover you in most indoor installations if you’re trying to cover a reasonable amount of space (ambient light and windows permitting). These ones tend to be heavier and larger (15lbs+) but offer more configuration options than the portable class (like advanced geometry correction, control over LAN). They are also designed for 24/7 operation so they are more acceptable to use for long term installations. Some models also support multiple lamps so that in case one burns out, it can switch to another one. Maintenance and support is generally easier with these as well, but at an obvious jump in price.
이 등급의 프로젝터들은 넓은 범위의 브랜드, 렌즈, 이미징 요소들을 갖고 있기 때문에 간결하게 정리하는 것이 어렵다. 90% 정도의 프로젝터가 이 등급에 해당한다. 주변광과 자연광이 들어오는 창문을 포함한 적당한 크기의 공간에서의 실내 설치 작업의 대부분에 사용할 수 있다. 포터블 프로젝터보다 더 무겁고 크지만, advanced geometry 조절이나 LAN을 통한 제어 등 더 많은 조절 옵션을 제공한다. 또한 하루 종일 동작할 수 있도록 디자인 되었기 때문에 장기간의 사용에 더 적합하다. 어떤 모델은 여러 개의 램프들은 갖고 있어서 하나가 나가면 다른 것으로 대체될 수 있다. 유지보수와 관리가 일반적으로 더 쉽지만, 가격대는 확 증가한다.
These projectors also start to bring in multiple lens options for short throw 0.4 to long throw 12.0 ratio with the same body. They also offer more options for lens zoom and lens shift which are super handy.
이런 프로젝터들은 다중 렌즈 옵션이 있어서 0.4의 작은 투사율부터 12의 긴 투사율의 렌즈를 하나의 몸체에 장착할 수 있다. 또한 더 많은 렌즈의 확대, 축소 기능과 아주 쉬운 렌즈 시프트 기능을 제공한다.
If you’re trying to get more than a 20ft wide image or are dealing with stage lighting, see my section below about properly calculating brightness and size before you drop your coins on a specific one.
6미터 이상의 넓은 이미지를 상영해야 하거나 무대 조명을 해결해야 한다면, 적당한 광량과 크기를 계산하는 방법에 대한 아래의 섹션을 참고해라.
You’re also much more likely to buy one of these projectors for a short run than rent one. If you are running and installation for a week or more, it quickly becomes more cost effective to just purchase one of these classes of projectors (or the portables) because you would be paying the same amount in a week or so anyway.
이런 프로젝터들 중 하나를 임대하기 보다 사야 할 수도 있다. 일주일이나 그 이상 운영할 예정이라면, 그 기간 동안의 임대료가 프로젝터들 중 하나를 구매하는 비용과 맞먹을 수도 있기 때문이다.
Large venue projectors
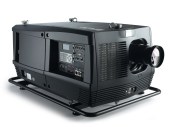
Price Range: $5000 – $Infinity
Brightness Range: 5000 lumens to 42,000 lumens (I’ve heard 100k lumens before, but can’t find a reference)
Resolution Range: 1024×768 to 4K
These ones can range from a form factor of about 2ft x 2ft x 8in all the way up to the size of a kitchen refrigerator. As brightness increases, so does the price and the space/ventilation/power requirements (and weight!). Another consideration is that at a certain point (around 15k lumens), 120V/15A mains just won’t cut it for a single projector, and you’ll need an electrician or special setup (240V/3 phase in US) to actually power the beast.
The high powered bulbs in these ones are also much more of a safety issue. When choosing a 20k versus a 30k rental for an event, I was told a professional projectionist would need to install the bulb in the 30k as it was unsafe to transport the projector with the expensive and fragile bulb inside. I was also told a fire marshall may need to be present to approve the safe operation of the projector as it presented a more significant fire hazard. The power of the bulbs also significantly shortens their lifespan down to about 1000 hours of operation compared to the smaller ones. The aging of these bulbs also has a much more noticeable effect on the image. Older bulbs will look much dimmer and more off color than brand new bulbs – something to keep in mind if you’re working with multiple high power projectors is to keep an eye on bulb life.
이 프로젝터들의 크기는 60*60*20센티 크기부터 냉장고 크기까지 다양하다. 광량이 증가할 수록 가격과 공간/통풍/전원/무게 등의 요구사항이 달라진다. 15000 루멘즈 정도의 프로젝터라면 120V/15A(미국의 경우)의 일반 전원으로는 감당할 수 없고 전기가와 전원 설정(3상 240V/미국의 경우)가 필요할 것이다.
이 프로젝터들의 고출력 전구들은 안전의 문제도 있다. 이벤트를 위해 20k와 30k 중에 선택할 때, 나는 프로젝션 전문가에게 비싸고 깨지기 쉬운 전구를 프로젝터 안에 두고 이동하는 것은 안전하지 않다고 말했다. 그리고 화재 위험이 더 크기 때문에 소방담당자에게 안전 조치에 대한 승인을 받을 필요가 있다고 말하기도 했다. 전구 출력의 수명 또한 보다 작은 전구들에 비해 1000시간 정도로 아주 짧다. 전구의 노화는 이미지에 큰 영향을 미친다. 오래된 전구는 새 전구보다 더 어둡고 색 표현력이 떨어진다. 여러 개의 고출력 프로젝터를 사용할 때에는 전구의 수명이 주의를 기울여야 한다.
Placement and mounting of these projectors is another important consideration. Some of the larger ones weigh 300+ lbs and will require trussing and investigation about whether the ceiling or structure can actually support them. For some events you may end up constructing a scaffold tower with the huge projector on top, and with your power supplies, media servers and workspaces underneath.
위치를 잡고 고정시키는 것 또한 이런 프로젝터들에 대한 또 다른 중요한 문제이다. 커다란 것은 130킬로그램 이상 무게가 나가기 때문에 받칠 수 있는 구조물이 필요하며, 고정시킬 것인지 구조물을 만들 것인지에 대한 분석이 필요하다. 어떤 이벤트에서는 커다란 프로젝터를 위한 비계를 만들어 그 위에 올려놓기도 하고, 그 아래에 전원, 미디어 서버 등의 작업 공간을 배치하기도 한다.
Like installation projectors, large venue projectors often offer multiple lens options for the same projector. Most offer throw ratios from 0.8 to about 7.0 or 12.0. These super zoomed ratios are helpful if you have a really tall building to projection map from the ground, or a screen that is over 100ft away and you’re trying to conserve your precious photons.
설치작업을 위한 프로젝터들 처럼, 대규모 프로젝터들은 하나의 몸체에 여러 렌즈를 교체해서 장착할 수 있는 옵션을 제공한다. 투사율은 0.8부터 7.0이나 12까지도 제공한다. 이런 막강한 확대/축소 비율은 지상에서부터 높은 빌딩에 프로젝션 맵핑을 하거나, 스크린에 30미터 이상 떨어져 있어서 빛을 잘 관리하고 보존해야 할 때 유용하다.
You’re also more likely to have to rent one of these projectors rather than purchase, so be prepared to source a rental house (who often require pricey production insurance, a solo artist will find it difficult to rent one!). Also owning one of these would be a pain because they are heavy, awkward, expensive to maintain, and you would need to rent them out yourself in order to break even. Prices vary on length of rental and type of equipment. From personal experience, I can tell you that a 20k lumen projector will run you roughly $1000-1500/day (including your lens choice), and 6k-10k lumens run around $700-1000 a day depending on lenses and HD requirements.
이런 프로젝터들은 구매하기보단 임대하게 될 것인데, 가끔 보험을 요구하기도 하기 때문에 개인 작업자는 어려움을 겪을 수도 있으므로 그에 대한 준비를 해놓는 것이 좋다. 하나를 구매해서 보유하고 있다면 무겁고 비싼 유지 비용 때문에 어려움을 겪을 수도 있으며, 고장 때문에 별도 프로젝터를 임대해야 할 수도 있다. 임대 기간과 장비에 따라서 임대료는 다양하다. 개인적인 경험으로는 20k 루멘스의 프로젝터는 하루에 1000~1500달러(렌즈에 따라 다르다) 정도이며, 6k~10k 루멘스의 경우 렌즈와 이미지 품질에 따라 다르지만 하루에 700~1000달러 가량 한다.
I wouldn’t suggest planning to rent one of the larger ones for a long term installation unless you have some serious budget. The prices to purchase these shoot up sharply after about 10k lumens. Most 20k lumens and above will run you $40,000 to $80,000 and beyond.
확실한 예산이 없다면 보다 큰 프로젝터를 장기간 임대하는 것은 권하지 않겠다. 10k 루멘스 이상의 프로젝터들의 가격은 급격하게 올라간다. 대부분의 20k 루멘스의 프로젝터들은 4만~8만 달러 정도의 가격대이다.
How to calculate projector intrinsics/read a spec sheet:
Being able to interpret a projector spec sheet is an invaluable skill to have when planning your project. You’ll have to separate the parts that are important, from the values that aren’t standardized or are there for marketing fluff-
프로젝터의 스펙을 해석할 수 있는 능력은 프로젝트를 기획할 때 매우 중요한 스킬이다. 표준화되지 않은 값들과 마케팅의 허풍들로부터 중요한 부분들을 찾아내야 할 것이다.
Image
Resolution: This is the actual maximum resolution the projector is capable of displaying. You can send it higher resolutions than this, but the physical number of pixels will remain the same. If it’s native resolution is 1280×800 and you send it 1080p, there is just going to be down sampling to match native resolution. If you see the spec “Supported Resolutions” – Warning! This spec is nearly useless and incredibly misleading. Only pay attention to the native resolution if you want the physical pixel count. Supported resolutions just means the resolutions that the projector is capable of accepting and then down sampling or up sampling to match its native resolution. There are 1024×768 native projectors that “support” 1080p but that doesn’t mean all those pixels are actually coming out of the lens.
해상도 : 프로젝터가 상영할 수 있는 실질적인 최대 해상도이다. 더 큰 해상도의 이미지를 쓸 수 있겠지만, 물리적인 해상도는 여전히 프로젝터의 최대 해상도이다. 기본 해상도가 1280*800이고 1080p의 영상을 틀었을 때, 영상은 기본 해상도에 맞게 축소될 것이다. ‘지원되는 해상도’라는 스펙이 있다면 조심해라. 이것은 거의 쓸모없고 오해를 하게 한다. 물리적인 실제 픽셀을 계산하고 싶다면 오직 기본 해상도에만 집중하라. 지원되는 해상도는 단지 프로젝터가 받아들여서 기본 해상도에 맞춰 축소하거나 확대할 수 있는 해상도이다. 1080p를 지원하는 1024*768 프로젝터는 실질적으로는 1024*768로 상영을 하게 된다.
Lumens: This spec is somewhat standardized with ANSI units, but different manufacturers can waver a bit. A difference of a couple hundred lumens between projectors isn’t much to consider if you need something slightly brighter, it’s easier to think in 1000 lumen increments generally. Also, as a guidance, you’ll want at minimum around 20 lumens per square foot of image.
루멘스 : 이것은 ANSI 단위로 표준화된 것이지만, 제조사마다 조금씩 다를 수 있다. 프로젝터들마다 조금씩 다른 수백 루멘스의 차이는 생각한 것 보다 조금씩 더 밝은 프로젝터를 사용한다면 고려할 사항이 아니다. 일반적으로 1000 루멘스 정도 더 밝은 프로젝터를 생각하는 것이 편하다. 일반적으로, 이미지의 30제곱센티미터 마다(1제곱피트) 적어도 20 루멘스 가량이 필요하다.
Contrast Ratio: This is another misleading/non-standardized unit. Ideally this will tell you the dynamic range or number of black pixels you would need to “stack” on top of each other to make a white pixel. 1:300 contrast ratio is poorer than 1:10,000 but companies use different ways to quantify their contrast, so it can be very hard to gauge what the reality is until you get one. Some projectors also have dynamic contrast which means that they automatically adjust their lens to provide darker blacks depending on the image that is coming through. Bit depth is also loosely related to contrast, but it is more of a limitation within video technology than the projector technology. Bit depth (8bit,10bit etc) would be the number of possible “steps” between a black and white pixel.
명암비 : 또 다른 표준화되지 않아 잘못 이해할 수 잇는 단위이다. 스펙을 보면 가변 범위를 알려주거나 흰색 색상을 만들기 위해 ‘쌓아야’ 하는 검은 점의 숫자를 말한다. 1:300의 명암비는 1:10,000보다 열악하다. 그러나 제조사들마다 서로 다른 방법으로 명암비의 양을 측정하므로 제품을 확인하기 전에 실제 어떨지 측정하는 것은 어렵다. 어떤 프로젝터는 가변 명암비를 가지는데, 이것은 이미지에 따라서 자동으로 렌즈를 조정해서 제공하는 어두운 검은 색을 말한다. Bit depth 역시 명암에 어느 정도 관련이 있지만 이것은 프로젝터 기술보단 비디오 기술의 제한에 더 관련이 있다. Bit depth (8bit, 10bit 등등)는 검은 색부터 흰색 픽셀 사이의 가능한 단계를 말한다.
3D: Occasional marketing fluff spec – read specs carefully if you really need 3D. Many projectors are “3D capable” if they have HDMI. Some of them operate at 120hz and work with active shutter glasses, but some setups you will need 2 projectors and some special polarizing filters and silver screens to actually make it work as well as a movie theater. Essentially, plan on extra equipment if you’re looking to do 3D, or read very carefully.
3D : 때때로 부풀려지는 스펙이다. 만약 정말로 3D가 필요하다면 스펙을 주의깊에 읽어야 한다. HDMI를 지원하는 많은 프로젝터들은 “3D 가능”이다. 어떤 것들은 120hz의 설정으로 3D 안경(shutter glasses)과 함께 동작한다. 그러나 어떤 설정은 2개의 프로젝터와 특별한 필터, 영화관 처럼 실제로 잘 동작할 수 있도록 실버 스크린 이 필요하다. 3D로 작업하고자 한다면 추가 장비를 계획하거나 아니면 스펙을 주의 깊게 살펴봐야 한다.
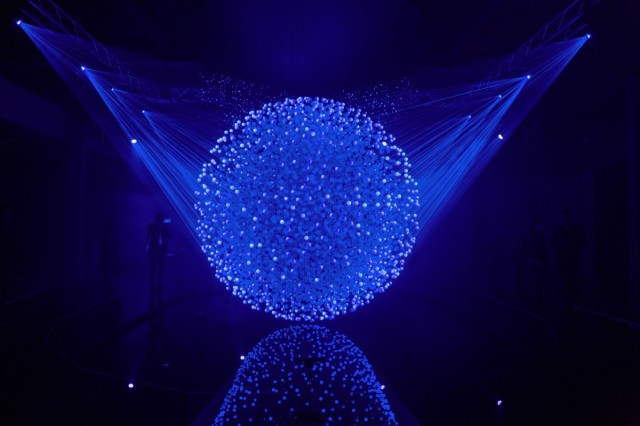
Fluidic – Sculpture in Motion by WHITEvoid
Geometry
Throw ratio: This is probably the second most important specification behind lumens. This value gives you the ratio of the width of the projected image to the distance from the surface. For example, a throw ratio of 1:1 means that for every 1ft away from the wall, you will get 1ft of image width (and your height is determined by the aspect ratio). Sometimes this is given as some random unit like “66″ @2m” which is usually diagonal size of the image at a certain distance. Lens zoom is also a related property because it allows you a small “variable” lens shift.
투사율 : 이것은 아마 루멘 다음으로 중요한 스펙일것이다. 이수치를 통해 프로젝트 되는 이미지의 넓이와 그 표면으로부터 프로젝터 사이의 거리를 알 수 있다. 예를 들어 1:1의 투사율은 프로젝터가 벽으로부터 1피트 멀어질때마다 투사되는 이미지가 1피트씩 커지는(투사되는 이미지의 높이는 화면비에 따라 결정된다.)것을 의미한다. 때때로 이것은 어떤 임의의 수치로 주어지기도 한다, 예컨데 “66″@2m”은 특정 거리에서 투사되는 화면의 대각선의 길이를 의미한다. 렌즈 줌은 또한 투사율과 연관된 수치이다. 왜냐하면 이 수치는 약간의 렌즈이동에 대한 가변성을 허락하기 때문이다.
Lens Shift: Lens shift is generally only available on higher end projectors. Most projectors have a slight lens offset that allows them to be below or above their screen and still have a square image (different than tilting!). Lens shift allows you to correct for this offset if necessary – just tilting the projector would result in more keystoning. Some have manual or motorized lens shift. This also lets you worry less about exact placement of your projector because you will be able to shift the beam around – just watch for vignetting on the edges!
렌즈 이동: 렌즈 이동은 일반적으로 고급 프로젝터에서만 사용가능하다. 대부분의 프로젝터들은 투사 화면을 사각형으로 유지한체 상하로 약간 조정할 수 있는 렌즈 오프셋기능을 (틸팅과는 다르다!) 가지고있다. 렌즈 쉬프트는 필요하다면 이런 렌즈오프셋을 교정할 수 있도록 해준다 – 단순히 프로젝터를 기울인다면 이미지의 왜곡에 대한 보정을 많이 해야한다. 몇몇 프로젝터들은 수동이나 모터로 작동되는 렌즈 쉬프트 기능을 가지고 있다. 이 기능을 이용하면 투사되는 빔을 주변으로 이동할 수 있기 때문에 프로젝터의 정확한 위치에 대한 걱정을 덜게 해준다 – 단지 화면 가장자리의 비네팅만 주시하면된다.
Physical
Inputs: Make a note of these to make sure you have options with VGA or HDMI or whichever. We will discuss analog versus digital connections further down.
입력: VGA또는 HDMI 아니면 다른 어떤 옵션이 있는지 확인해두도록 하라. 우리는 아날로그 – 디지털 신호 변환에 대해 아래에서 논의할 것이다.
Watts/Power Consumption: This is important to have on hand if you’re wondering if you might blow a circuit by running multiple projectors. See below on how to calculate it.
와트/전력 소비: 만약 여러대의 프로젝터를 작동시키는데 따른 회로 손상을 걱정한다면, 이것을 손으로 계산하는것이 중요할 것 입니다. 아래에서 이것을 어떻게 계산하는지 확인하라.
Size/Weight/Noise Level: Always good to know your dimensions if you need to fabricate a special box or fit it into a tight area. Weight is also very good to know for when you’re choosing mounts or calculating whether the ceiling can hold the thing. Also good to note how loud a projector is going to be if you’re doing a quiet/sound based installation – I’ve heard some loud ones before
크기 / 무게 / 소음 정도 : 만약 당신이 특별한 상자를 제작해야 하거나 혹은 프로젝터를 좁은 공간에 맞춰야한다면, 당신은 프로젝터의 크기를 알아두는것이 좋다. 마운트를 고르거나 천장이 지탱할 수 있는지 계산해야 하는경우 프로젝터의 무게를 알고있는것이 좋다. 만약 조용한 사운드 베이스의 설치작업을 할 경우 프로젝터가 얼마나 시끄러운지 알아두는 것이 좋다 – 나는 무척 시끄러운 프로젝터 소리를 들어본적이 있다.
Quick note about power consumption – it’s always good to know off hand how much power your event or installation setup requires. In the US most electrical outlets are 120V/15A, EU is 240V/16A generally. Most spec sheets will give your projector power consumption in watts (sometimes as: eco power mode, normal, and lamp-on). Once you have the number of watts and you know the voltage of the electrical outlets, you can calculate how many amps you need so that you don’t trip the circuit you’re running off of. The equation is:
전력소비에 대한 빠른 정리 – 당신의 이벤트나 설치물의 설정에 얼마나 많은 전력이 필요한지 아는것은 매우 좋다. 일반적으로 미국에서는 대부분의 전기 콘센트는 120V/15A이고 EU는 240V/16A이다. 대부분의 스펙 표들은 당신의 프로젝터의 전력소비량을 watts로 알려준다.(때로는 에코파워모드, 일반, 램프-온 으로 나눠져 있다.) 일단 watts수치와 전기콘센트의 전압을 알고 있다면, 회로차단기가 떨어지지 않도록 얼마나 많은 전력량이 필요한지 계산할 수 있다. 그 방정식은 다음과 같다.
Watts/Volts = Amps
와트 / 볼트 = 암페어
300W(projector power consumption)/120V(supply voltage from outlet) = 2.5Amps
300와트(프토젝터의 전력 소비량)/120볼트(콘센트로부터의 공급 전압) = 2.5암페어
You could potentially run 5 (12.5A) of these theoretical 300W projectors on a single 15A circuit. Always leave yourself some headroom with power demands – know in advance if you need more dedicated circuits. Some projectors also may need a larger pull of power when they first spark the lamp, so keep that in mind when powering up.
당신은 어쩌면 5개의(12.5A) 이론적으로 300와트의 프로젝터들을 단일 15A 회로에서 사용 할 수 있을 것이다. 항상 요구되는 전력양보다 여유를 가져라 -당신이 더 민감한 회로를 원한다면 미리 알고 있어야 한다. 또한 어떤 프로젝터들은 처음 램프에 전원을 넣을때 많은 전력을 소비하기도 한다는것을 명심해야 한다.
Working with Throw Ratio:

Now let’s talk about throw ratio and how you can make it work for you. Feel free to use the many online projector calculators and apps – but it’s good practice to run the numbers yourself. Sometimes the online calculators don’t have the applicable options or sort of obfuscated results expressed in odd units or diagonal size (help me, Pythagoras). Using your throw ratio only, you can easily calculate the image width and height for a given distance.
이제 투사율와 그 사용법을 알아보자. 프로젝터를 위한 계산기나 App들도 많으며, 숫자를 직접 계산해보는것도 좋은 연습이 된다. 때때로 온라인 계산기들은 적절한 적용 옵션이 없거나, 이상한 단위의 사용이나 대각선 계산 결과를 보여주는든 혼란스러운 결과를 보여주곤 한다. 투사율을 사용하면 쉽게 주어진 거리에 대한 투사이미지의 넓이와 높이를 계산할 수 있다.
Light Leaks by Kyle McDonald and Jonas Jongejan – Filling a room with projected light
Throw ratio = distance from surface/width of image
투사율=투사면으로부터의 거리 / 투사이미지의 넓이
0.5=2/x or at 2ft from a wall with a 0.5 throw ratio makes an image that is 4ft wide
From this value we can also get the height of the image if we know the aspect ratio (eg 16:9 or 4:3) of what we are planning to project (or the aspect ratio of the projector’s native resolution)
0.5=2/x 는 벽으로부터 2피트, 투사율이 0.5의 경우에 투사 이미지의 크기는 4피트가 된다는 것이다.
계획하고 있는 프로젝션의 종횡비(예를 들면 16:9나 4:3과 같은) 또는 프로젝터 기본 해상도의 종횡비를 알고 있다면 투사된 이미지의 높이를 계산할 수 있다.
Image height = (1/aspect ratio) * Image Width
이미지 높이 = (1/종횡비) * 이미지의 넓이
From the above example, if we have 0.5 throw 2ft away with a 16:9 aspect ratio, what is our height?
위의 예제로부터, 만약 0.5의 투사율를 가지고 있고 투사면으로부터 2피트 떨어진 거리에서 16:9의 종횡비를 가진다면 투사되는 이미지의 높이값은 얼마인가?
Height = 1/(16/9) * 4 = 2.25ft
높이 = 1/(16/9) * 4 = 2.25피트
Now that we know the width and height of our image, we can now easily calculate the answer to the question covered in the next section: “Is this going to be bright enough?” You can also use this value to calculate the angle of the projection frustum on the horizontal and vertical if you’re curious about how close people can get to the projection surface before they start causing shadows. You’ll need to know the projector offset to get really exact about this though – most projectors don’t come 100% straight out of the lens without lens shift.
이미지 높이와 넓이를 알고 있으니 이제 손쉽게 다음 섹션에서 다룰 질문에 대한 답을 할 수 있다. “지금 투사되는 이미지는 충분히 밝은가?” 또한 이 수치들은 관객들의 그림자가 생기기 전까지 얼마나 가까이 다가갈 수 있는지 확인하기 위한 투사체의 절단체의 수직각, 수평각을 계산하는대 사용할 수 있다. 하지만 이것을 정말 정확하게 알고 싶다면 프로젝터의 오프셋을 알아야 한다. 대부분의 프로젝터들은 렌즈 이동 없이는 프로젝터로부터 100프로 똑바르게 투사되지 않는다.
Please note to always calculate things to be bigger than you need them to be by a few percentage points. Manufacturers numbers can be slightly off, or your placement may need to shift slightly. Giving yourself an extra +/- 5% of image could be really helpful. Be careful not to overshoot too much and throw away resolution and brightness though – try to hit that sweet spot.
항상 필요한 수치보다 몇 퍼센트 더 크게 계산해야 한다. 제조사에서 제공하는 수치들은 실재보다 조금씩 클 수 있다. 혹은 설치가 약간 옮겨져야 할 수도 있다. +/-5퍼센트 정도 더 큰 이미지를 쓰는 것이 큰 도움이 될 수도 있다. 너무 과도하게 밝거나 높은 해상도로 투사하지 않도록 주의해야 한다 – 가장 이상적인 위치를 찾아보라.
How to calculate projected brightness:
프로젝터의 밝기를 계산하는 방법
There are a few different ways to measure brightness of a projected image. One way to think of projected light is as a paint bucket full of a finite amount of photons. You’re always going to have the same amount of light-paint, but the more you spread it, the “thinner” the coat gets, subsequently dropping brightness. Our primary concern is our lumens per square foot ratio, as this is the value that really changes the final output. This is just calculated as:
투사되는 이미지의 밝기를 측정하는 몇 가지 다른 방법들이 있다. 투사되는 빛에 대해서 이해하는 하나의 방법은 페인트통에 가득 담긴 일정량의 빛으로 간주하는 것이다. 당신은 항상 같은 양의 빛 페인트를 가지고 있는데, 그것은 넓게 칠할수록 그 층의 두께는 얇아지고 점차적으로 어두워지게 된다. 가장 우선적인 관심사는 최종 이미지의 밝기를 결정짓는 단위 면적당 루멘의 비율이다. 이것은 다음과 같이 계산된다.
Total Lumens/Area of projection
전체 루멘/투사되는 영역의 크기
2000Lumens/40 sq feet of projection surface = 50lumens/square foot
2000루멘스/40평방 피트의 투사영역 = 50루멘스/평방 풋
Ideally (and anecdotally) you want to stay above a minimum value of around 20lumens/square foot (or around 6 lumens/sq. meter). Once you dip below that value, you run the risk of your brightness and contrast being so weak that your image is washed out or unacceptably dim in less than ideal conditions.
이상적으로 20루멘/제곱풋 (혹은 약 6루멘/제곱미터) 정도의 밝기를 유지해야 한다.(위에서 본 것처럼 1 sq feet 에 20 루멘 이상 확보하는 것이 좋다) 그 이하의 밝기에서는 이미지가 색감이 떨어져 보이거나 이상적인 조건보다 너무 어둡게 보일 수 있다.
There are many factors that can alter the eye’s perception this calculated value including:
- Screen type/Screen gain – reflectivity of the screen
- Surface type – May be the side of a building, or a block of wood, or a regular white vinyl screen.
- Ambient light – dim gallery, bright show room, etc
위에서 계산된 수치뿐만 아니라, 눈의 인식을 바꿀 많은 다른 인자들이 있다.
- 스크린의 종류/스크린 게인 – 스크린의 반사정도 (참고 : http://www.projectorcentral.com/projector_screens_gain.htm)
- 표면의 종류 – 빌딩의 옆면 혹은 나무블럭 혹은 일반적인 흰 스크린과 일 수 있다.
- 주변광 – 어두운 갤러리, 밝은 쇼룸 등
Your type of surface can also affect your total brightness and contrast. Walls, screens, building exteriors, scrims, front or rear are all decisions that carry their own potential issues. Avoid really dark surfaces at all costs, as they absorb much of your photons and don’t reflect as many. However, in some situations gray screens are preferable over white screens because the gray can absorb more of the ambient light and improve contrast.
표면 타입 역시 프로젝션의 전체적인 밝기와 대비에 영향을 끼친다. 벽, 스크린들, 건물 외관, 직물, 표면 혹은 후면 등은 모두 잠재적인 이슈들을 가지고 있다. 정말 어두운 표면은 빛을 흡수하기 때문에 별로 빛을 반사시키지 않기 때문에 반드시 피하해야 한다. 그러나 몇몇 상황에는 회색은 주변광을 흡수해서 화면의 대비를 증가시킬 수 있다.
Rear projection can also cost you some brightness depending on the materials you’re projecting through. Rear projection has the side effect of giving you a fat hotspot right in the middle of your screen where the projector bulb is. To avoid the hotspot effect you need a rear projection material that can really diffuse the light at the expense of photons and contrast. A low gain screen will diffuse the light more and make it more even with rear projection but it will decrease the overall contrast because it also picks up more of the ambient light. A low gain screen is as efficient as a high gain screen, but it spreads the photons out to more viewing angles, so not as many are concentrated coming straight out at the average viewer. A high gain rear projection screen will seem a little more “transparent” which will improve contrast, but you will get a larger hotspot in the center. There are also specialized screens like 3M’s Vikuiti film that uses a light absorbing layer and glass beads to provide an ideal experience of limited hotspot and while also absorbing ambient light for really deep blacks.
투사하려는 재질에 따라서 후면투사는 밝기가 줄어들 수 있다. 후면투사는 프로젝터램프가 위치가 있는 화면의 중심의 오른쪽 부분에 넓은 핫스팟을 만들 수도 있다. 이와 같은 핫스팟 효과를 피하기 위해 후면 투사용 스크린재질은 밝기와 대비의 손실을 감수하더라도 빛을 잘 확산시키는 재질을 사용해야 한다. 빛 반사율이 낮은 스크린(low gain screen : 어둡지만 빛이 골고루 잘 퍼지며 시야각이 좋다)은 후면투사시에도 빛을 더 잘 퍼지게 하고 투사면 전체의 밝기를 동일하게 만들어주지만 주변광의 영향을 받기 때문에 전체적인 대비는 감소시킨다. 낮은 빛 반사율(reflectivity)을 가진 스크린은 높은 빛 반사율의 스크린(high gain screen : 밝지만 시야각이 좁고 핫스팟이 생길 수 있으며 원본 이미지의 색상과 다를 수 있다)만큼 효과적이지만, 빛을 시야각보다 더 넓게 확산시키기 때문에 높은 빛 반사율을 가진 스크린보다 평균적인 관람자들의 시선을 끌지 못한다. 높은 빛 반사율을 가진 후면투사용 스크린은 화면의 대비를 향상시킬 수 있게 조금 더 투명하지만 중심부에 더 큰 핫스팟이 생기게 된다. 3M사의 Vikuiti 필름과 같은 전문적인 스크린들이 있는데, 이것들은 작은 유리알들과 빛을 흡수하는 층을 사용해 한정된 핫스팟과 이상적인 경험을 주고, 주변광을 줄여 깊은 블랙을 표현한다.
You can use a light meter to determine the ambient light in your space so you know what your reference point is. Once you know this value, you have an idea of the brightness you’ll need for your projection to compete properly. You would need a light meter that measures in footlamberts to give you an easy to work with value for the ambient light in your space. Personally, I have heard to try and make your brightness about 8 times brighter than expected room brightness so you can get acceptable contrast from the baseline of light in the room, but this is highly variable depending on your environment and intended effect. For example, an ambient light value of 5fl in a space would recommend a projected value of around 40fl to compete properly. You can obviously get away with less (or more), but keep these values in your pocket if they become necessary.
프로젝션을 할 공간의 주변광을 측정해 기준을 정하기 위해 노출계를 사용할 수 있다. 그 수치를 알고 나면 적당한 프로젝션에 필요한 밝기를 정할 수 있다.이처럼 공간에 있는 주변광을 고려해 쉽게 작업하기 위해 노출계가 필요하다. 개인적으로 공간의 밝기에 알맞는 대비의 결과물을 위해, 프로젝션의 밝기를 방의 밝기보다 8배 높게 하라는 이야기를 들은적이 있는데, 하지만 이같은 이야기는 환경에 따라 아주 다르다. 예를 들어, 공간 내 주변광의 밝기가 5fl일경우 대략 40fl의 밝기가 적절하다. 당신은 분명히 밝기를 이 수치에 정확히 맞추지는 못하겠지만 필요할 수 있으니 이 수치를 알아둬야 한다.
빛에 대한 단위들
– 휘도(Luminance) / 광도(Luminous Intensity) / 조도(Illuminance) : http://blog.naver.com/youngdisplay/60191469769
– Foot-Lambert(Fl) : 휘도의 단위. http://en.wikipedia.org/wiki/Foot-lambert
– 빛 관련 단위 변환기 : http://www.translatorscafe.com/cafe/EN/units-converter/luminance/14-1/
– 1fl = 약 3.426lumens
Stacking two matching projectors on top of each other does NOT mean the image will perceptually appear to be twice as bright. For example if you stack two 4000 lumen projectors, there are still 8000 lumens bouncing back at you, but your eye’s perception of brightness is not linear, so it will not be seen as two times as bright – just brighter. You can also use the stacked projection to cover twice as much area with the same perceived brightness as using just one with half the square footage. Stacking also brings up the issue of brightening the black level with 2 stacked projectors, which in turn will change the perceived contrast between black and white and image quality. For optimal perception for your eyes, you want the projected image to have as much contrast from the surroundings as possible…there is a reason we watch movies in dark theaters.
동일한 두개의 프로젝터로 이미지를 겹쳐서 투사한다 하더라도 이미지가 두배로 밝아지지는 않는다. 예를 들어 4000루멘의 프로젝터를 두개 겹치면 당신이 볼수 있는것은 8000루멘이지만, 밝기를 인식하는 눈은 선형적으로 동작하지 않습니다. 따라서 이것은 두배 밝아보이는것이 아니라 그냥 더 밝아보일 뿐입니다. 당신은 또한
두배 넓은 영역에 겹쳐 투사하는 방법을 사용해서 한개의 투사와 동일한 밝기로 보이게 할 수 있습니다. 겹치기는 검은색을 두배 더 밝게 만들어 사람에게 인식되는 흑과 백 사이의 대비정도와 이미지품질에 영향을 줄 수 있습니다. 당신의 눈에 가장 최적으로 보이기 위해서 투사되는 이미지와 주변환경과의 대비를 가능한한 크게해야 합니다. 그게바로 영화관이 어두운 이유이기도 합니다.
To stack projectors you will ideally want ones in the installation or large venue class with motorized lens shift or ones that offer perspective distortion in their hardware – otherwise aligning the images of 2 projectors to be pixel perfect can be a nearly impossible feat. Access to lens shift is preferable, followed by the projector doing the actual distortion. You can do homography distortion in software to align the two, but then you’ll need to essentially double your video output to output different streams.
겹쳐서 투사하기 위한 이상적인 프로젝터는 모터로 동작하는 렌즈 이동이나 투시 왜곡을 제공하는 대형 프로젝터들이다. 그렇지 않으면 2개의 프로젝터간의 픽셀단위까지 완벽한 일치는 거의 불가능하다. 실재 프로젝터의 이동을 통한 겹치기는 왜곡이 생기기 때문에 렌즈 쉬프트를 통해 처리하는게 이상적인다. 소프트웨어를 통해 2개 투사 영상의 정렬을 맞출 수 있지만, 그러려면 2개의 비디오 아웃풋이 필요해진다.
Video signal quality and cable lengths
비디오 신호품질과 케이블 길이
Your video signal path is another very important consideration when planning. Analog and digital signals have their strengths and weaknesses. You will need to ensure your computer is compatible or you have the right adapters – especially if you’re working with an existing projector system in a space (S-Video anyone?)
비디오 케이블의 경로는 프로젝션을 기획할 때 고려해야 하는 매우 중요한 사항이다. 아날로그와 디지털 신호들은 각각 장단점이 있다. 컴퓨터가 호환되는지 혹은 적당한 어뎁터들을 가지고 있는지 먼저 확인해야 한다 – 특히 이미 계획하는 공간에 설치되어 있는 프로젝터를 사용해야 하는 경우에 더욱 그렇다.
DVI/HDMI
DVI and HDMI are the most common digital video cables right now. DVI can support a wide range of resolutions, and can handle the highest ranges with a dual link (DVI-D) cable. Single Link DVI is missing some of the center pins and has a lower bandwidth, it maxes out at 1920×1200 @60hz which is about 3.96gbit/s of data. Dual Link DVI cables are only technically limited by the copper bandwidth limits, DVI source limits and sync limits. Dual Link cables occasionally list their bandwidth resolution limits of around 9.9gBits/second which you can use to check your intended use and how close you may be to hitting the ceiling.
DVI와 HDMI는 현재 가장 일반적인 디지털 비디오 케이블이다. DVI는 넓은 범위의 해상도를 지원하고 듀얼 링크 케이블을 통해 가장 큰 해상도를 다룰 수 있다. Single Link DVI는 가운데 있는 핀들 중 일부가 없고 더 낮은 대역폭을 가지므로 최대 출력이 1920*1200px, 60hz에서 초당 3.96gbit의 최대 출력을 가진다. Dual Link DVI케이블은 기술적으로 단지 구리선의 대역폭, DVI 소스와 싱크의 제한에 따라 달라진다. Dual Link 케이블은 보통 초당 최대 9.9gbit의 대역폭과 최대 해상도를 가지고 있으므로, 사용하려는 용도와 최대치에 얼마나 가까운지 확인할 수 있다.
Resolution Width * Resolution Height = Total Number of Pixels
해상도 넓이 * 해상도 높이 = 전체 픽셀의 갯수
Total Number of Pixels * Refresh Rate = Total Number of Pixels per Second
전체 픽셀의 갯수 * 재생율 = 1초동안의 전체 픽셀의 갯수
Total Number of Pixels per second * Color resolution bits = Total Bits Per Second
1초간의 전체 픽셀의 갯수 * 색상 비트 = 1초간의 전체 비트
2560*1440 = 3,686,400 pixels
3,686,400 * 60hz = 221,184,000 pixels per second
221,184,000 * 24 (Bits of color) = 5,308,416,000 bits per second = 5.3gbit/s
I tend to trust DVI cables up to about 35ft, although the spec will get you to about 50ft. HDMI cables are more reliable at longer distances and have a larger consumer marker so it may be easier to find a reliable long cable. Symptoms of a digital cable that is too long or poor quality (or just not plugged in all the way!) will be something like:
DIV케이블의 스펙은 50피트 지만, 나는 35피트까지만 신뢰하는 편이다. HDMI케이블은 시장이 크고 더 긴거리에서도 믿을만 하기 떄문에 신뢰할만한 긴 케이블을 찾기 쉽다. 너무 길거나 품질이 안 좋은(혹은 애초에 꽂아지지도 않는!) 디지털 케이블은 증상은 아래와 같다.
- Unpredictable sync behavior
예측불가능한 동기화 - Strange “noise” with the pixels, particularly in the blacks or on smooth gradients – this is a result of certain digital bits being flipped incorrectly because they weren’t transmitted correctly over the cable. You can see this in the image below
검은 색이나 부드러운 그라디언트 화면에서 이상한 노이즈들 – 이것은 특정비트가 정확하게 전달이 되지 않아 그 값이 튀기때문에 생기는 결과이다.
![]()
They sell longer HDMI and DVI, but unless it’s really thick or your have had time to test it with your desired equipment, I would highly recommend an extender for distances over 100ft. Extenders come in different flavors and budget ranges, but it tends to be a case of “You get what you paid for” so don’t expect a 20 dollar no-name brand extender to give you 100% reliability. There are signal boosting couplers, extensions over Cat5/Cat6, and extension over fiber optic. Cat5/Cat6 extenders can be used with VGA/DVI/HDMI but some of them can be especially finicky with certain output or display devices, so try and test as realistically as possible beforehand. Fiber optic extenders are top of the line because of their clean signal quality and ability to extend over 1000ft on a single cable. Fiber is VERY delicate (roughly handling it or kinking the cable can shatter the glass inside) and needs special considerations when running it. Fiber is also one of the more expensive extension options, so be prepared to rent your cable and extenders.
100fit(30m)보다 더 긴 길이의 HDMI와 DVI케이블을 구할 수 있지만, 케이블이 매우 두껍거나 원하는 장치와 테스트 할 수 있는 충분한 시간이 없다면 신호연장장치를 사용하는것을 매우 권장한다. 신호연장장치들은 서로 다른 특성을 가지고 예산에 따라서도 그 선택이 달라지지만, 비싼만큼 제값을 하므로 20달러짜리 이름없는 브랜드의 신호연장장치가 100프로의 신뢰를 줄 수는 없다. Cat5/Cat6 그리고 광섬유를 연장시킬 수 있는 증폭장치가 있다. Cat5/Cat6 연장장치는 VGA/DVI/HDMI와 함께 사용할 수 있지만 그 중 몇몇은 특정 출력이나 디스플레이 장치에서 특별히 까다로울 수 있으므로 최대한 실제와 가까운 환경에서 사전 테스트를 하도록 하라. 광섬유 연장자들은 깨끗한 신호 퀄리티와 단일 케이블을 통해 1000피트 이상 확장 할 수 있어서 가장 성능이 좋다. 광섬유는 매우 섬새하고(손으로 거칠게 다룰경우 내부에 있는 유리가 깨질 수 있다) 특별히 사용시 주의를 기울여야한다. 광섬유와 연장장치는 매우 비싸기 때문에 대여를 하는 방법도 있다.
A final note is to pay attention to how your extender handles passing an EDID. An EDID is basically a packet of info that a video source and destination share that gives info about resolutions and timings. Without a proper EDID handshake, you’ll be scratching your head “trying to figure out why this still isn’t fucking working!” Some extenders send EDID over a separate Cat5 cable, so keep this in mind when constructing wiring diagrams. There are EDID Emulators and DVI Doctors that go in between a source and display. These devices can do things like “store” the EDID of a display and keep it in case you are going between your display and another device that disrupts the EDID like a switcher. Other DVI Doctors also work to clean up the DVI signal to make it easier to extend the signal, sort of like an amplifier.
마지막으로 주의해야 할 점은 연장장치가 EDID신호를 어떻게 전달하는지 하는 점이다. EDID는 비디오 소스와 출력장치가 공유하는 패킷데이터로서 해상도나 타이밍 등의 정보를 담고있다. 적절한 EDID 결합이 없다면 당신은 머리를 긁적이며 “왜 작동이 안되는거지?!” 라고 말하게 될것이다. 몇몇 연장장치들은 EDID 신호를 별도의 Cat5 케이블에 실어 보낸다, 따라서 배선도를 그릴 때 이것을 명심하도록 하라. 소스와 디스플레이 사이에 EDID 에뮬레이터와 DVI닥터들이 있다. 이런 장치들은 EDID를 저장하고 있다가 디스플레이와 또 스위처와 같은 다른 장치 사이에서 EDID를 유실할 경우 저장된 EDID를 이용한다. 다른 DVI doctor들은 신호증폭기의 일종으로, DVI 신호를 깨끗하게 해서 신호를 확장하기 쉽게 만들어준다.
SDI/HD-SDI
HD-SDI Cables are a great cable for sending video long distances. You’ll commonly see them being used to send HD video from cameras into switcher and recording setups. They use a fairly common BNC barrel connector. You will often need a converter box to send your HDMI/DVI signal over HD-SDI since most computers don’t offer that as an output option without something like a Black Magic card.
HD-SDI케이블들은 긴 거리의 비디오 신호를 보내기에 아주 훌륭하다. 당신은 이것을 주로 HD video를 카메라로부터 스위치나 녹화 장치들에 전달할 때 주로 볼 수 있다. 이것들은 꽤 일반적인 BNC 커넥터이다. Black Magic(https://www.blackmagicdesign.com/uk/products)과 같은 카드가 아니라면 보통의 컴퓨터에서 신호를 보낼 수 없기 때문에, HDMI/DVI신호를 HD-SDI로 보내기 위해서는 컨버터 박스가 필요하다.
VGA
VGA is the most common analog cable that is still kicking around. It is still able to push 1080p and above at certain distances, but it will probably die out over the next decade as we transition to 4K. VGA cables are good in a pinch with lower resolutions at longer distances without boosters, but I wouldn’t recommend them in professional use. The higher the resolution you’re trying to shove down that copper pipe, the less potential success you’ll have at getting your computer or projector to recognize the device at the other end because the same cable has to manage more bandwidth and needs a higher quality output device to generate the higher resolution clock timing for the analog signal. VGA also has the issue of analog distortion or a certain degree of “fuzziness” and color shifting because the colors are sent at different high speed clock frequencies, and this gets exacerbated on longer cables or on lower quality output devices. The inconsistency of analog can also mean you may get slight pixel offsets that you wouldn’t get with a digital cable.
VGA는 주변에서 찾을수 있는 가장 일반적인 아날로그 케이블이다. 이 케이블은 특정 거리 내에서는 1080p나 그 이상의 해상도를 전달 할 수 있지만, 다음 10년동안의 4K로의 전환기동안 사라지게 될것이다. VGA케이블은 부스터 없이 낮은 해상도와 긴 거리를 연결하기에 알맞지만, 전문적인 용도로 사용하기에 추천하지 않는다.
당신이 원하는 더 높은 해상도는 더 많은 대역폭을 감당하고 더 고해상도의 아날로그 신호를 만드는 고품질의 출력 장치가 필요하기 때문에 구리케이블에 무리를 주어서, 컴퓨터나 프로젝터가 반대편의 연결된 장치를 인식하지 못할 수 있다. VGA는 또한 아날로그 왜곡이나 특정 각도의 흐릿함, 색상값들이 다른 고속클럭의 주파수로 보내지기 때문에 생기는 색상이동과 같은 현상들이 더 긴 케이블을 사용하거나 혹은 낮은 품질의 출력장치들을 사용할때 더욱 심하게 발생한다. 아날로그의 불일치는 또한 디지털 케이블에서는 발생하지 않는 약간의 픽셀이동을 의미한다.
Maintenance, miscellaneous caveats and tricks of the trade
Maintenance tips:
NEVER (EVER!) UNPLUG A PROJECTOR with its lamp on. It can potentially destroy your expensive bulb! Projectors run their fans for a minute or two to cool the bulb in preparation for the next lamp on. If you unplug a hot projector, plug it back in and shock it with the electrical charge needed to spark it on, you risk damaging the delicate filament and either blowing your bulb out or severely reducing the lifespan. If you happen to unplug a projector while it is on, let it cool for 10-30 minutes before turning it back on. Don’t try to turn it back on hoping you can get the fan going or something.
램프에 불이 들어왔을때에는 절대로 프로젝터의 플러그를 뽑지 말라! 그런 행동은 당신의 비싼 램프를 망가뜨릴 수 있다. 프로젝터들은 다음번에 램프의 전원이 들어올것을 고려해 전원을 꺼도 1-2분간 렘프를 식히기 위해 팬을 돌린다. 만약 당신이 뜨겁게 달궈진 프로젝터의 전원을 그냥 뽑아버리고 즉시 다시 꽂는다면, 전기적인 충격에 의해 섬세한 주의를 요하는 필라멘트에 손상을 입히거나 렘프를 깨뜨릴 수 도 있고, 사용시간을 크게 단축시킬 수도있다. 만약 프로젝터가 켜있는동안 전원 플러그를 빼버렸다면, 10-30분동안 열을 식힐 수 있도록 하라. 팬이 다시 돌게 하기 위해 플러그를 다시 꽂으려 하지말라.
Ventilation is important!
환기는 중요하다.
Projectors need to suck in new cool air, blow it over the bulb to absorb its heat, and then push it out another side. Without air flow, the bulbs temperature can rise to unsafe levels. Luckily, most projectors have detectors for this and will automatically shut off when their bulb temperature reaches a certain threshold. Still, you probably want to avoid having your projector auto-shutoff during an event or long running installation. Most manuals will also advise you not to run your projectors sideways in “portrait” mode because it will change the factory designed airflow and shorten bulb life – I haven’t personally experienced a significant issue with running them portrait, but it is trickier to manage their air flow in this position. Some projectors also have a specific filament placement that can impact whether it is safe to run them in unusual configurations because the filament may not be centered within the bulb.
프로젝터는 찬 공기를 빨아들여 전구의 열기를 식혀낸 뒤 바깥으로 배출한다. 이러한 공기의 흐름이 없다면 전구의 온도는 위험할 정도까지 상승 할 수 있다. 다행히 대부분의 프로젝터들은 이러한 위험을 감지할 수 있는 장치들이 있어서 전구의 온도가 특정수치 이상으로 상승하면, 자동으로 전구의 전원을 내리게 된다. 당신은 이벤트나 작품 진행중에 프로젝터들이 자동으로 꺼지게되는 것을 막고자 할 것이다. 대부분의 설명서들은 프로젝터를 옆으로 뒤어서 사용하는것을 금하고 잇는데 이것은 공장에서 디자인 한 공기의 흐름대로 공기가 순환되서 전구의 수명을 줄이지 않기 위함이다. – 하지만 필자는 개인적으로 아직까지 옆으로 뉘어 사용하는데 있어서 특별한 이슈를 경험하지는 않았지만, 이런 자세에서 공기의 흐름을 관리하는것은 어려운일이다. 어떤 프로젝터들은 전구내의 플라멘트의 위치가 틀어지게 될경우 충격을 받게 될 수도 있기떄문에 일반적이지 않은 형상으로 사용하는것은 안전하지 않다.
Projector placement considerations
프로젝터 배치시 고려사항들
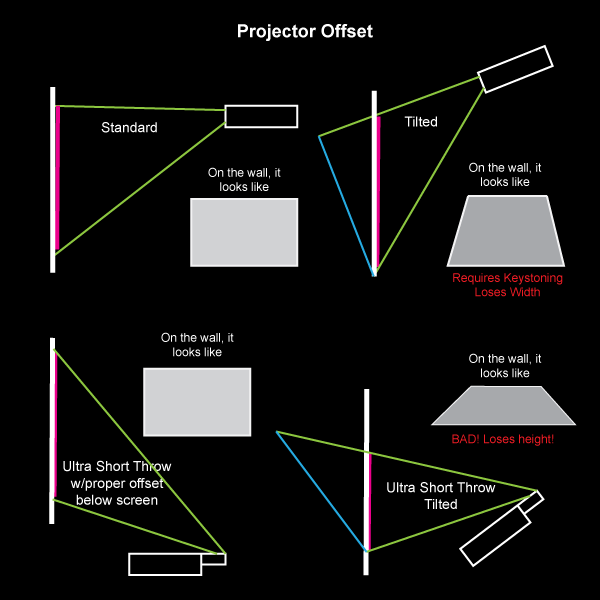
In the event that you can’t get enough distance to get the desired image size, you have a few options. You can get multiple projectors and edge blend them (complex setup depending on your environment). A lot of consumer ultra short throws that are closer than 0.8 throw have setups so that they bounce the beam off a mirror and overtop of the projector to get every inch of possible distance. A mirror is a good way to extend the distance of your normal projector as well, with an important caveat: you need what is called a first surface mirror, or front surface mirror. A first surface mirror has the reflective coating on the top layer rather than underneath the glass. A normal mirror with coating on the backside will have a potential to give you a double image or color distortions because of the beams bouncing from the glass and the reflective surface.
당신이 원하는 이미지의 크기를 얻기에 충분한 거리를 확보하지 못하는경우에 사용할 수 있는 몇가지 옵션이 있다. 당신은 여러 개의 프로젝터들을 엣지 블랙드를 시켜 사용할 수 있다.(상황에 따라 복잡한 설정이 필요할 수 있다.) 많은 사람들이 0.8이하의 투사율를 가진 초근거리 프로젝션을 위해 프로젝터의 빛을 거울에 한번 반사한 뒤 프로젝터 위쪽으로 투사함으로써 사용 가능한 모든공간을 사용할 수 있도록한다. 거울을 사용하는 방법은 보통의 프로젝션 환경에서도 거리를 확장 시킬 수 있는 좋은 방법이다. 다만 이를 위해서는 First surface mirror 또는 Front surface mirror가 필요하다. First surface mirror란 반사코팅 영역이 유리위 뒷면이 아닌 앞면에 씌워진 거울이다. 일반 거울은 이중 이미지를 만들어낼 가능성이 있고 유리로부터 반사된 빛과 그 표면에서 반사된 빛으로 인해 색상 왜곡이 일어날 가능성이 있다.
>> First surface mirror : wiki(http://en.wikipedia.org/wiki/First_surface_mirror)
Ultra short throws and mirror solutions have a noteable side effect to plan for: projection offset. I have experienced this a few times first hand until I figured out my mistake. When using these solutions, the projector will need to be either sigificantly above or below the center point of the desired screen. Sometimes they need to be almost 3-5 ft below the bottom or top of the screen itself. Trying to shoot these offset solutions straight out to the center will result in extreme warping and a reduction in image size (primarily height).
초근거리 투사와 거울을 이용한 방법을 계획할 때 생각해야만 하는 부작용이 있다. : 프로젝션의 이동. 나는 실수를 알아차리기 전에 몇번 이것을 경험 해본적이 있다. 이런 방법을 사용했을 때 원하는 스크린의 중심점으로부터 위 혹은 아래로 많이 이동한 적이 있다. 때때로 스크린을 3-5피트 아래 혹은 위로 이동해야 했다. 이러한 중심점 옵셋 투사는 극단적인 휘어짐과 이미지 크기 감소의 결과이다.
Misc.
A wide angle/short throw lens will have the effect of giving you a lower depth of field which would be relevant if you are doing some kind of projection mapping that would have a lot of depth to it. The focus and brightness fall off much more quickly than with a longer throw lens, so mapping with these can be a challenge. 0.4 Throw to 0.8 throw is usually a lens solution, but 0.4 and less usually involves a curved mirror which limits your ability to focus on much more than a plane.
광각 / 짧은 투사율를 가진 렌즈는 낮은 심도(depth of field)를 갖고 있으므로 당신이 상대적으로 깊은 깊이를 가지고 있는 프로젝션 매핑작업을 할때 영향을 준다. 긴 투사율를 가진 렌즈에 비해 조금만 깊어저도 금방 촛점이 어긋나고 밝기가 어둡게 되기 때문에 상대적으로 어려운 작업이 된다. 0.4에서 0.8사이의 투사율는 일반적인 렌즈의 투사율이지만 0.4보다 낮을 경우 보통 곡면 거울을 갖고 있기 때문에 평면 렌즈보다 초정을 맞추는데 제한적이다.
Experimental Tech and the Future
The following are some links to some equipment that would be fairly unusual to see in most major productions at the moment.
아래 링크에는 현재 주요 제조사에서는 보기 힘든 꽤 특이한 장비들에 대한 링크들이다.
A big dream for a lot of us would be to have a projector with an embedded infrared camera that looks through the exact same lens as the projector in a 1:1 relationship so that there is easy alignment between camera and interactive content.
프로젝터와 정확히 같은 렌즈를 이용하는 적외선 카메라가 내장되어 카메라와 인터렉티브 컨텐츠 사이의 정렬을 쉽게 해주는 프로젝터가 우리의 꿈의 프로젝터일 것이다.
Texas Instruments DLP Dev kit for embedded projectors in other projects – http://www.digikey.com/product-highlights/us/en/texas-instruments-dlp-technologies/688
TI’s Pico Projector with Ultraviolet light source – http://www.ti.com/devnet/docs/catalog/thirdpartydevtoolfolder.tsp?actionPerformed=productFolder&productId=16180
Projection Design’s 1080p Infrared Projector – http://www.projectiondesign.com/products/fs33-ir-series
Sony’s 4K Projector – http://www.cnet.com/products/sony-4k-ultra-short-throw-projector/
Projection Design’s Remote Light Source – Allows for your light source to be a few meters away from your for space and noise concerns – only at around 2000 lumens right now: http://www.projectiondesign.com/corporate/press/projectiondesign-fr12-remote-light-source-projector-in-control-at-ons
Also, having a look at the DIY projector scene can give you some really interesting ideas. You can make an almost passable projector with an LCD screen and a fresnel lens surprisingly enough. http://www.instructables.com/id/homemade-projector-cornflake-box/step4/attach-magnified-glass/ && https://www.youtube.com/watch?v=n_3RDuOV3qU
Thanks
..to Kyle McDonald, Chris Jordan, Zach Leiberman for providing input and reviewing the article. Huge thanks also to Elliot Woods who gave me a really helpful review with extra tips and probably the most hilarious point by point commentary on the article.
Other resources to check out:
Wikipedia for DLP: http://en.wikipedia.org/wiki/Digital_Light_Processing
On the maximum length of VGA: http://www.wirelessforums.org/alt-comp-hardware/max-resolution-vga-connector-22437.html
Da-Lite’s (somewhat dated) articles on projection: http://www.da-lite.com/education/angles_of_view.php
Using light meter to determine brightness: http://www.avsforum.com/t/755705/using-the-ca813-light-meter-to-measure-your-front-projector
Digital projector myth: http://www.kenrockwell.com/tech/digital-projector-myth.htm
3 types of projectors explained: http://forums.afterdawn.com/thread_view.cfm/74117
http://www.engadget.com/2012/04/16/redray-4k-cinema-laser-hands-on/
Remote light source: http://www.projectiondesign.com/products/fr12-series
Top 10 Pico: http://www.projectorcentral.com/popular-pico-projectors.htm
Reading about LCoS: http://www.projectorcentral.com/lcos.htm
Discussion about stacking projectors: http://forums.prosoundweb.com/index.php?topic=96088.0
http://www.electricstuff.co.uk/picoproj.html
Should you use white or gray screens? – http://www.projectorcentral.com/white_gray_projection_screens.htm
What is Screen Gain? –http://www.projectorcentral.com/projector_screens_gain.htm
Brightness – http://www.projectorcentral.com/home_theater_projector_buyers_guide.htm?page=Brightness
LINE SEGMENTS SPACE by Kimchi and Chips, 2013 / Projection, Nylon string, Code.
